Date 5/26/2000
Waiting on the rest of my parts for Donkey Kong to come in. Once they come in (should be this week or early next week) I can start work on the cabinet. I'll probably start this weekend on the cabinet.
|
Date 5/26/2000
Ok, I started the Patch work on the cabinet and I have worked up the Pin-outs necessary to convert the Popeye harness to Donkey Kong. It looks like a breeze (Check out my Donkey Kong page for a comparison) to do and I might be able to keep it so that it would be a snap to put Popeye back in (except for the fact that the monitor needs to be rotated ) Compare the picture on the right with the one I have below! Rock Hard Water Putty works wonders. Notice in this picture I also have the White trim on!
|
Date 5/26/2000
A couple changes in plans. I was originally going to use the original Donkey Kong power supply, however, I've decided against this. I have decided to use the existing Popeye Power supply and add a second power supply to supply the +12 and -5 that Donkey Kong needs. All I have to do is pop out the 4 wires from the existing Molex connector and create a new Molex connector that is going to be attached to the new PS. This will make it easy for me to convert the cabinet back to Popeye if I ever decide to. It will also be easier to make sure that I have everything hooked up correctly because the wiring harness between Popeye and Donkey Kong are almost identical (See my Donkey Kong Page for the comparison). By separating them out, I should be able to just plug it in and have it work. (Hopefully).
|
Bone-Head Move of the YEAR!
Date 5/26/2000
Ok, stupid me, without thinking things through, I hooked up my Donkey Kong using BOTH power supplies. STUPID STUPID STUPID. Scratch one monitor. Its toast. So boys and girls, what lesson did we learn? Never use two different power supplies to power the same board. Thanks to Al Gross and Jim (His Tech) I got a new monitor and my game is now hooked up to a SINGLE power supply. The original Popeye power supply is still used to power the Monitor ONLY. No other power is used from this supply. The only reason I can use the original supply is because the Monitor (and light fixture) plug into the outlets and no other power is fed to them unlike the Boards themselves which were fed, +5 and +24 from one power supply and +12 and -5 from the other. Stupid me. I should have known better. Oh well, live and learn. I hope some one is reading this and avoids this mistake. What really surprised me, was that the monitor was fried and not the board itself. Guess I got lucky in that respect.
|
CONVERSION IS COMPLETE!
Date 5/26/2000
One minor disaster later, the conversion is complete. I now have a fully operational Donkey Kong! Check out my pictures. The only thing I have left to do is paint the cabinet. Its been a real pain in the ass trying to color match the side. If anyone knows what the original color of the cabinet is, please send me an Email! A little more patchwork and its DONE! Then I start on my Side Arms. I'm still deciding on whether or not to convert it back to Dig Dug or just leave it and make it so I can put more 2 player games in it. More on this in the future... I'm also missing the front sticker just below the control panel that tells you how much to put in the game ($.25 for 1 Play, $.50 for 2 Players). If anyone has an extra one of these, please let me know. If you have any questions concerning this conversion, feel free to drop me a note. I learned a lot while doing this conversion and hope to do a lot more.
|
Date 5/26/2000
The locks have been replaced and the back/top have been painted with a Flat Black. Looks really good. I have Semi-Gloss Black for the front parts and the Semi-Gloss blue for the sides.
|
Date 5/26/2000
Tried a touch of the blue that I got the codes from the Internet and its too light. I am going to have to color match this thing somehow. I really don't want to have to haul it down to Home Depot :-) I also have a feeling that a Roller is not going to give me that Smooth look that I want. I might have to get something like a Wagnor power sprayer or something along those lines...
|
Date 5/26/2000
Added more pictures. The pictures show the inside (as requested) and the problem with the color codes that I got off the Interenet. If anyone has a more accurate color match, please let me know.
|
Date 5/26/2000
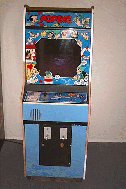 This is what I started with. This is what I started with.
A Dedicated Popeye that is going to be converted to a Dedicated Donkey Kong.
|
Date 5/26/2000
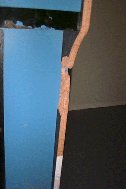 Here is the Damage that I have to repair. Here is the Damage that I have to repair.
Looks like maybe a security bar or something of that nature was here and they ripped it out. Time for some Rock Hard Water Putty.
|
Date 5/26/2000
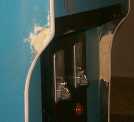 All Fixed! All Fixed!
Just need to smooth it out and paint it now.
|
Date 5/26/2000
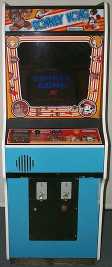 Here is the final product of the Conversion! Doesn't look a thing like Popeye anymore does it? Just a little painting left to do and I can stick a fork in it! Here is the final product of the Conversion! Doesn't look a thing like Popeye anymore does it? Just a little painting left to do and I can stick a fork in it! What I learned from this conversion is that you should NEVER EVER hook two power supplies up to your board at the same time. This has a bad habit of killing your monitor! Second, save the TRIM for last AFTER you paint. I might have to replace the TRIM on here again after I paint. I think I can just make sure I clean it up real good when I'm done painting.
|
Date 5/26/2000
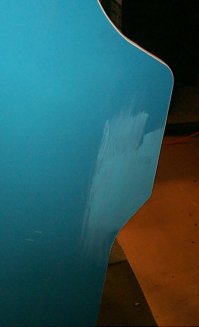 The color codes that I got off the internet were not quite right as you can tell by this picture. The color codes that I got off the internet were not quite right as you can tell by this picture.
The color is a couple of shades too light. The other problem that I am going to have to deal with is a way to get the sides smooth like the original cabinet. I think it might require me to use a spray gun to apply the paint. If that is the case, then I'll have to figure out how to spay paint my cabinet without getting paint over everything else in my garage :-)
|
Date 5/26/2000
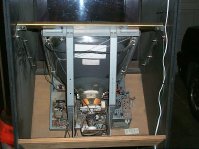
 Here are the Guts. As you can see, the addition of the Switching power supply (not sure I would mount it there again, but its not too bad). The white cord coming from the top (right side) is the cord for the new light fixture. Notice the blue splicing blocks. Where the blocks are, is where the new cord ended, so I spliced in the old cord and the attached it to the power block (right side, has the white wires and black wires attached to it) Here are the Guts. As you can see, the addition of the Switching power supply (not sure I would mount it there again, but its not too bad). The white cord coming from the top (right side) is the cord for the new light fixture. Notice the blue splicing blocks. Where the blocks are, is where the new cord ended, so I spliced in the old cord and the attached it to the power block (right side, has the white wires and black wires attached to it) The only thing used on the original power supply is the power block and the one outlet on the left (black cord plugged into it). I learned (the hard way) that its not a good idea to use both power supplies at the same time to power the game! DOH! The boards now sit in the cage where the Popeye boards were. A real Donkey Kong cabinet has the boards mounted on stand-offs with no cage present. I like the cage better.
|
Date 5/26/2000
 Popeye's Monitor was mounted horizontally (as can be seen by the bolts and dust ) where as, Donkey Kong is a vertical game. Popeye's Monitor was mounted horizontally (as can be seen by the bolts and dust ) where as, Donkey Kong is a vertical game.
Note: A new hole had to be drilled on both sides of the cabinet to accomidate the mounting bracket. Unless you want to fill in the empty holes, I would recommend keeping the old bolts in place. No one would know that they are not used.
|
Date 5/26/2000
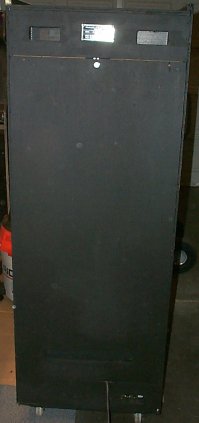 A fresh coat of paint does wonders! A fresh coat of paint does wonders!
This picture doesn't really do it justice (even the zoomed up picture). I'm currently using a Flat black on the back and top. I probably should put a second coat on to make it look even better. This thing looks brand new from the back! Try it, you'll be amazed.
|
Pinout Comparison
Date 5/26/2000
Here is the pinout of Donkey Kong edge connector compared to Popeye. As you can see, they are almost identical. Donkey Kong uses +12 and -5 volts which Popeye doesn't. Areas where they differ are marked in Gray. A lot of people have asked if the Power supply for Popeye can be used with Donkey Kong, and at this point, I am not sure. If you get +12V on Pins E and 5 and you get -5 on Pin F and 6 then there is no reason it wouldn't work. | Popeye | Donkey Kong | A | GND | GND | B | GND | GND | C | +5 | +5 | D | +5 | +5 | E | N/A | +12 | F | N/A | -5 | G | N/A | N/A | H | COIN | COIN | J | 1PLAYER | 1PLAYER | K | MAIN RIGHT | MAIN RIGHT | L | MAIN LEFT | MAIN LEFT | M | MAIN UP | MAIN UP | N | MAIN DOWN | MAIN DOWN | P | MAIN PUNCH | MAIN JUMP | R | N/A | N/A | S | SERVICE | SERVICE | T | GND | GND | U | TVR | TVR | V | TVB | TVB | W | TV AUDIO | TV AUDIO | X | COUNTER | COUNTER | Y | GND | GND | Z | GND | GND | | 1 | GND | GND | 2 | GND | GND | 3 | +5 | +5 | 4 | +5 | +5 | 5 | N/A | +12 | 6 | N/A | -5 | 7 | N/A | N/A | 8 | 2 PLAYER | 2PLAYER | 9 | N/A | SUB RIGHT | 10 | N/A | SUB LEFT | 11 | N/A | SUB UP | 12 | N/A | SUB DOWN | 13 | N/A | SUB JUMP | 14 | N/A | N/A | 15 | N/A | N/A | 16 | GND | GND | 17 | TVG | TVG | 18 | SYNC | SYNC | 19 | N/A | SPEAKER | 20 | +24 | +24 | 21 | N/A | GND | 22 | GND | GND |
|
Color Information
Date 5/26/2000
For those wondering what color the cabinet is, well its Amsterdam by Gliden. Atleast that is what I have heard, as soon as I get some spare time (yeah right!), I'll be repainting my cabinets and will know for sure.
|