Date 3/27/2000
Control Panels are the hardest things to find in great shape. Most of the time, they have been butchered pretty badly. This is true with my Metrocross control panel. It was first born as a Moon Patrol control panel. Later in life someone decided to convert the Moon Patrol into a JAMMA game. In the process of the conversion to JAMMA they drilled and cut many holes in the control panel. Since I don't own a Table Saw yet, I decided to make an attempt at fixing this one. This is what I have documented on my "Experiment" of fixing it
|
The Filler
Date 3/27/2000
 What I used was some Rock Hard Wood Putty. What I used was some Rock Hard Wood Putty.
I've had people recommend everything from Glue with Sawdust mixed in, to using Bondo. I'm going to give this a shot since this is what I currently have. If it fails, then I'll try one of the other techniques. The thing I am mainly concerned with during this whole thing is how the putty will stand up to stress. I would hate to be in the middle of a game and rip the joystick out or slam a button through the control panel. That would suck.
|
This is the starting point...
Date 3/27/2000
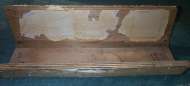
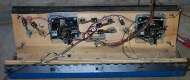 Here is what I had to start with. Here is what I had to start with.
The next picture will really show the damage
|
Date 3/27/2000
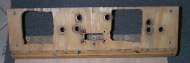 As you can see, you could drive a truck through the holes that have been cut into this control panel. As you can see, you could drive a truck through the holes that have been cut into this control panel.
If I had a table saw I would chuck this out the window and just build a new one. However, since I don't have a Table Saw, its time to start filling the holes.
|
Step 1
Date 3/27/2000
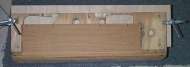
 The first thing I did was to put a spare board behind the control panel and clamp it on with two "C" clamps. The first thing I did was to put a spare board behind the control panel and clamp it on with two "C" clamps.
This will make it a lot easier to fill the holes without worrying about the putty falling on the floor. Lets hope it doesn't stick :-)
|
Step 2
Date 3/27/2000
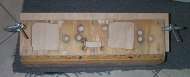
 Because the holes are so large I found some spare wood that I would use to fill the majority of the hole. Because the holes are so large I found some spare wood that I would use to fill the majority of the hole.
I made approximate measures and then cut it into two pieces to use as filler. The spare would is only 3/8" thick while the control panel is 3/4" thick. I would have preferred something a little thicker, but I didn't have anything over 3/8" and under 3/4" thick lying around. I didn't want anything that was the same thickness so I could have some putty above and below the filler wood.
Hopefully this will make it stronger.
|
Step 3
Date 3/27/2000
 Here you can see the two extra pieces of filler sitting in the holes. Here you can see the two extra pieces of filler sitting in the holes.
I'm not looking for a perfect fit, just something that will give it some strength when I go drilling new holes.
|
Step 4
Date 3/27/2000
 Here is the control panel with all the holes filled in. Here is the control panel with all the holes filled in.
Don't worry about it being smooth or level. Once its "Rock Hard", I should be able to sand it down smooth. The other thing about this control panel is that they cut about 1/32" off the top to fit a metal plate on top. So after this coat has dried, then I'll probably apply another layer to build it back up to the correct thickness.
|
Step 5
Date 3/27/2000
 So far so good! So far so good!
This is what it looks like after its dried. Its interesting to see that the thicker layers of putty dried darker than the thinner layers. I let it dry for 24 hours before I went to the second coat.
|
Step 6
Date 3/27/2000
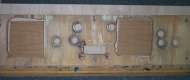
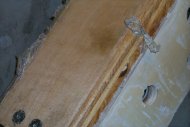
 Looking at the bottom you can see the two boards I used as filler and the holes that were filled through with putty. Looking at the bottom you can see the two boards I used as filler and the holes that were filled through with putty.
Thanks to the board I had clamped to the bottom of the board, all the putty was nice and flat. Now its time to apply a coat of putty to this side as well. Careful not to fill in the holes used for the Bracket between the top and bottom boards.
|
Step 7
Date 3/27/2000
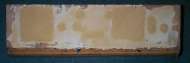
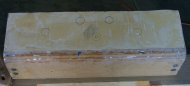
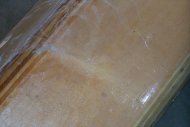
 Here you can see the second coat of putty after its dried. Here you can see the second coat of putty after its dried.
It feels pretty solid, but the final two tests will tell all. (Drilling Holes and the Stress test of Use).
|
Step 8
Date 3/27/2000
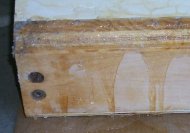
 Here is the bottom of the board with putty applied and dried. Here is the bottom of the board with putty applied and dried.
I allow at least 24 hours to dry, these have had a week to dry. Still feels very solid. We shall soon find out. The next step is going to be sanding both sides down smooth and adding more putty if its not flat enough or thick enough.
|
Step 9
Date 3/27/2000
 Once you have everything filled in and you let it set for a day or two, you can then get ready to drill the holes that you need. 1 1/8" is a perfect fit for the buttons. Once you have everything filled in and you let it set for a day or two, you can then get ready to drill the holes that you need. 1 1/8" is a perfect fit for the buttons.
I used a 1 1/4" for the Joystick hole. Before you start you drilling you may want to sand it down as smooth as you can get it. I used 150 grit sand paper and a finishing sander to smooth it out. It didn't turn out 100% perfect, but I think it will do for now.
The template that I have is the plexi that was over a JAMMA game control panel. I use it just to get the general location of where I want the holes to show up.
|
Step 10
Date 3/27/2000
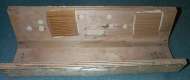
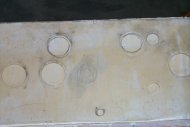
 Mark all the holes that you want to drill. Mark all the holes that you want to drill.
I did it by eye'n it and in doing so the right button is slightly closer to the joystick than the left button is. If you want it more exact, I suggest measuring everything out. No biggie, but I didn't realize this until AFTER I had done step 10 :-(. As you can see in the picture, I have all the holes that I plan on drilling all layed out.
|
Step 11
Date 3/27/2000
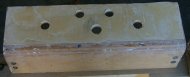 Drill the holes that you need. Drill the holes that you need.
Again, I used 1 1/8" Hole Saw bit for the buttons and I used a 1 1/4" for the Joystick hole Be careful as the wood will splinter on the exit side of the drill bit. You can avoid some if not all of the splintering by drilling down so that the 3/8" center bit comes through, then drill from the bottom up about 1/8" or 1/4". Then finish drilling the hole through the top. You may need to vary the depth that you drill from below to get it perfect
|
Date 3/27/2000
 Another thing to keep in mind is that the Wood Putty may be slightly brittle at the edges of the holes, so don't go twisting the drill around too much or you may cause parts to chip off. Another thing to keep in mind is that the Wood Putty may be slightly brittle at the edges of the holes, so don't go twisting the drill around too much or you may cause parts to chip off.
The buttons lip should cover any chips that may have been created due to the drilling..
|
Step 12
Date 3/27/2000
 Depending on how easily the overlay came off your control panel, you might have some adheasive left on it like mine. Depending on how easily the overlay came off your control panel, you might have some adheasive left on it like mine.
I tried using a Heat Gun to remove the adheasive with limited success.
|
Date 3/27/2000
 As you can see, the heat gun is getting some of it off, but there is still A LOT of adheasive remaining. As you can see, the heat gun is getting some of it off, but there is still A LOT of adheasive remaining.
Time for the Paint Stripper.
|
Step 11
Date 3/27/2000
 What I found to work very well is Paint Stripper. What I found to work very well is Paint Stripper.
Pour that stuff on, let it work for a few minutes and then start scraping it off. Works very well.
|
Date 3/27/2000
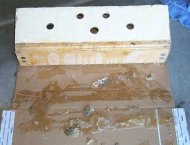 Make sure you have cardboard or something else under it though as the paint stripper will make a mess as you can see in this picture! Make sure you have cardboard or something else under it though as the paint stripper will make a mess as you can see in this picture!
|
Done!
Date 3/27/2000
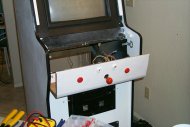 Well, its done! Well, its done! The final analysis is that Fixing a control panel like this "Works", but If you put it in a game like Robotron or another game that has a High Torque to it then its likely that it will break. Using Bondo might be a better solution. The other problem I found was making the top level. This was extreamly hard since the Rock Hard Wood Putty didn't go on very smoothly. Also when it dried it left several small "holes" (for lack of a better word) that were very hard to fill in. The putty would also become brittle after getting wet again and drying out. This only happened on the bottom side of the CP where the putty was fairly thin. The bulk of the putty stayed hard. I wanted to put some Vynal over the CP, but I couldn't find anyone local who had it. Home Depot could have ordered some that probably would have worked, but I was too impatient, I wanted to be done with this and get my Metrocross finished. So I settled for some stuff called "Magic Covering" from Home Depot. Its slightly better than Wall paper, but not by much. However, considering its only $5 for a roll that I could use to cover hundreds of control panels, I decided to go for it. As it turns out, the stuff stretches and tears pretty easily. I am not too confident on its Long Term life either, only time will tell. It looks pretty nice though and it is CHEAP. All in all, it didn't turn out TOO bad. Building a replacement would be prefered, but that has its own set of problems. Its a good alternative when you don't have the ability to make a new control panel from scratch. When I fix my Joust Control Panel, I'll put up a tutorial on how to fix a control panel using Bondo.
|