What we have to start with
Date 9/17/2006
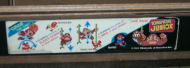
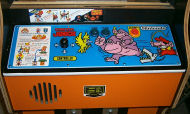
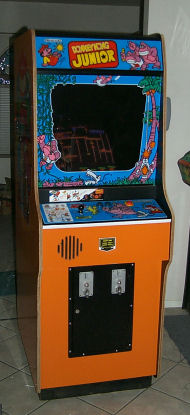
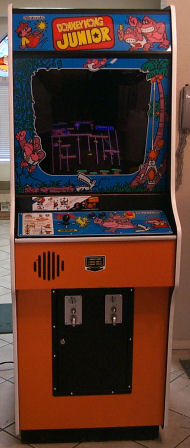
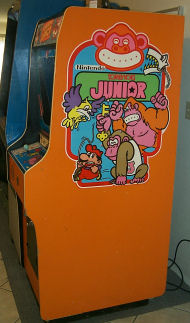 As you can see, the cabinet is in pretty decent shape. The side art is in very good shape. There are minor nicks and scratchs in it, but other then that it's great. I won't need to use my DK Side Art that I have. The front Bezel is in awesome shape as well. The control panel is in very good shape, but you'll see that it has issues (listed below). As you can see, the cabinet is in pretty decent shape. The side art is in very good shape. There are minor nicks and scratchs in it, but other then that it's great. I won't need to use my DK Side Art that I have. The front Bezel is in awesome shape as well. The control panel is in very good shape, but you'll see that it has issues (listed below). The Marquee is an ink jet printed copy that was taped to cardboard and has wet stains on it. I hope that is from water! I have a Repro, so I'm good to go with that. It has a few problems and here they are: The monitor needs a cap kit, There is no audio. The front base board is loose It needs new T-Molding The joystick needs to be replaced The button needs to be replaced. Need to replace the instruction card on the CP Need to re-laminate the top of the wood in front of the bezel Needs a New Marquee Should replace the sticker on the front of the cabinet for the Insert Coin Should replace the sticker on the front under the bezel
|
Step 1 - The Dissasembly
Date 9/17/2006
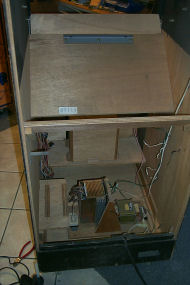
 The first thing I did was to remove everything (except the power supply) from inside the cabinet. The first thing I did was to remove everything (except the power supply) from inside the cabinet.
It needed to be vacumed out. As you can see in the picture there were quite a few cobwebs and dust. The monitor also needs a cap kit. For now I am just going to swap the monitor out with another Sanyo that I have sitting around.
|
Inside is now empty!
Date 9/17/2006
 Now that everything is out, I break out the vacume cleaner and clean it out. Now that everything is out, I break out the vacume cleaner and clean it out.
Removing all the cobwebs, dust and other small junk in the cabinet. It's pretty dusty, but no worse then most.
|
Game has no sound!
Date 9/17/2006
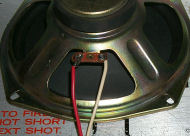
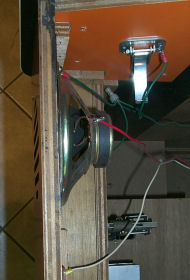 When I bought the game, the seller said it had no sound and thought that it was the AMP on the monitor. Well, based on this picture, I'm guessing that the "No Sound" issue is because only one of the speaker wires is hooked up! Speakers like two wires most of the time. When I bought the game, the seller said it had no sound and thought that it was the AMP on the monitor. Well, based on this picture, I'm guessing that the "No Sound" issue is because only one of the speaker wires is hooked up! Speakers like two wires most of the time. It might be a little hard to see, but the actual tab where a quick disconnect connects is broken off. Not a big deal as I will solder the wire on to what is left of the metal. Just means it's more "Permanent".
|
Speaker Fixed!
Date 9/17/2006
 A quick job with the soldering iron and we are good as new. A quick job with the soldering iron and we are good as new.
If the speaker dies, it would be just a matter of clipping the wires and hooking them up to a new speaker. I think I've only seen ONE bad speaker in all these years and that was on my Gyruss, so I'm fairly confident that this will last for quite some time.
|
Front Base Board is broken
Date 9/17/2006
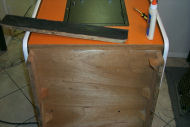 The front board on the base of the cabinet was loose, so I pulled it completely off so I could glue it back into place. The front board on the base of the cabinet was loose, so I pulled it completely off so I could glue it back into place.
|
Glue it, Clamp it, Let it set overnight.
Date 9/17/2006
 Like the title says, I glued it up on the three sides then clamped it down and let it sit over night. 24 hours later it felt very strong. I was going to put some staples or braids in it again, but it feels like it's strong enough for the enviornment that it will be in. Like the title says, I glued it up on the three sides then clamped it down and let it sit over night. 24 hours later it felt very strong. I was going to put some staples or braids in it again, but it feels like it's strong enough for the enviornment that it will be in. Notice how my Clamps match the Cabinet? Maybe the Mfg was a Nintendo fan :-)
|
On to the Art work
Date 9/17/2006
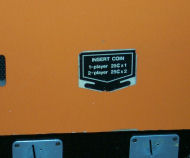 The Insert Coin sticker was still on the cab, but it was a little rough. The Insert Coin sticker was still on the cab, but it was a little rough.
I had a new Reproduction one (I think it was from Arcade Renovations) so I decided to replace it.
|
Upper Instructions are rough too
Date 9/17/2006
 Like the Insert coin this sticker was still on the cabinet which is rather rare to find. Like the Insert coin this sticker was still on the cabinet which is rather rare to find.
However, this one had seen better days as well. Again, I have a reproduction of the sticker so I decided to replace it.
|
Control Panel Instructions have water damage
Date 9/17/2006
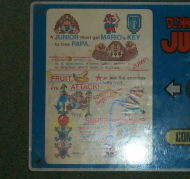 The camera flash covered up the worst part of the instuction sheet. The camera flash covered up the worst part of the instuction sheet.
All things considered, this is actually in pretty good shape compared to some I've seen. Again, I have a Reproduction of the instructions and I have a repro of the CP overlay.
|
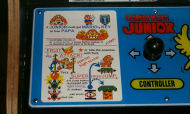
All New Control Panel Art
Date 9/17/2006
 Looks brand new! Looks brand new! Ok, there are a few things I need to point out. The first is that the colors are slightly off on the control panel and the upper instruction sticker. The control panel overlay blue is slightly lighter then the original CPO. Not a big deal really as it still looks fantastic! The colors are slighty off on the upper instruction sticker. The Red behind "Donkey Kong Junior" is too light. Donkey Kong should be lighter shade of brown. Other then that it looks great. The reproduction CPO is slightly smaller then the original (by maybe an 1/8" on each side). Everything lines up nicely though, so only the most anal collector would notice. The one annoying thing about the repro though is the button holes are just a tad smaller then the original so the buttons don't just drop into place. I actually had to "Snap" them into place. Even with all those issues I'm very happy with the results and would have no problem buying more of the same Repro stuff.
|
Replace the ugly blue joystick
Date 9/17/2006
 Here you can see a much better shot of the new Instruction card. Here you can see a much better shot of the new Instruction card.
Just amazing! You can also see the new joystick that I put in. It was taken off a spare control panel I had (VS System). The joystick sticks a bit, so I'll need to grease it up. Makes playing the game right now very challenging when you move a direction and Jr doesn't stop. This is especially bad when climbing down a vine and he goes flying off the end of it!
|
CP Wiring issue found
Date 9/17/2006
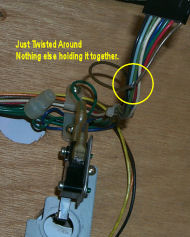 When I was working on the Control Panel I noticed that the brown wire was hacked together. Someone had just twisted the wires together and left them like that. When I was working on the Control Panel I noticed that the brown wire was hacked together. Someone had just twisted the wires together and left them like that. Well, that's not really a good thing to leave like that, so I soldered them together and put a piece of heat shrink tube over it. Turned out very nice. I'm sold on soldering and heat shrinking now. No more crimp connectors as they look bad compared to this method (will have to put up a picture later).
|
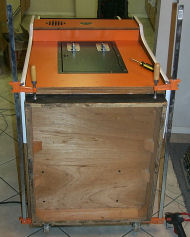
It's starting to look a lot better!
Date 9/17/2006
 It's starting to take shape now! The monitor bezel was in really really good shape so I didn't need to use my Repro for that. I ordered some new t-molding from T-Molding.com and that should be here this week. Once that is on, the game is pretty much done. It's starting to take shape now! The monitor bezel was in really really good shape so I didn't need to use my Repro for that. I ordered some new t-molding from T-Molding.com and that should be here this week. Once that is on, the game is pretty much done. There are a few other things I can or need to do. The first is replacing the power cord. Like every other game on the planet the Ground plug has been removed. I could also repaint the back door to make it look nicer. I could also put new locks in the game. It probably wouldn't hurt to try and track down a few new buttons if that is possible. Nintendo for some reason used a different type of button then everyone else which makes them hard to come by. If you know of a source or someone who is doing reproductions of them, drop me an email! The last thing that will need to be done is to fix the light fixture. I think I have a line on new bulbs, but I'm not sure about the starter. Might have to replace the whole light fixture like I did on my Donkey Kong. These odd ball parts really make it challenging to restore them to as close to the original as possible.
|
Greased up the Joystick
Date 9/17/2006
The joystick was sticking and making the game very hard to play so I used a bit of grease on it and it's as good as new. Will have to put a Photo Tutorial together for this in the future when I have some spare time.
|
New T-Molding! Looks nice!
Date 9/17/2006
 The new T-Molding from t-molding.com arrived today so I put it on. The T-Molding is not an exact match, but pretty damn close. It looks like it's off by about 1/64" width wise and it's not as flat as the original. However, it looks way better then the old stuff. The new T-Molding from t-molding.com arrived today so I put it on. The T-Molding is not an exact match, but pretty damn close. It looks like it's off by about 1/64" width wise and it's not as flat as the original. However, it looks way better then the old stuff. If your t-molding it beat up or missing, I would recommend ordering some new t-molding and putting it on. It does wonders for the appearance of the game.
|
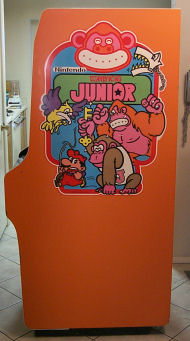
The Left side
Date 9/17/2006
 Here is a shot of the left side of the game all cleaned up. Here is a shot of the left side of the game all cleaned up.
Yes, that is the original Side Art!
|
And now the right side....
Date 9/17/2006
 Here is the right side, and that too is the original side art! Here is the right side, and that too is the original side art! The only remaining task is the light fixture. I've order some bulbs and starters that should work in the original light fixture, however, the starters are on back-order. This means it might be awhile before I can finish that part. I replaced the power cord. It's a shame that I had to, the only thing missing was the ground plug and everything else was in perfect condition. The new cord is a lot shorter then the original, but it is safer now. I looked into just replacing the plug on the end, but Home Depot wanted $8 for just the connector. For that much I can just get a new cord with the plug and have it look nicer.
|